
A major culprit that has been causing havoc among computer users is the Icaibathinda.org redirect virus. This rebounding digital menace sneaks into computers and wreaks havoc by interfering with online activities and compromising system performance. In this guide, we will navigate the digital trenches to understand the nature of redirect viruses like Icaibathinda.org, understand their modus operandi, and the potential damage they cause.
Quick Links
Additionally, specific steps will be detailed on how to perform a comprehensive scan of your entire computer system and how to manually remove the Icaibathinda.org redirect virus for those who wish to master the art of the digital clean-up process.
What Is Icaibathinda.org Redirect Virus
In the rapidly evolving world of digital technology, where innovation and dangers surface with almost equal frequency, a constant threat we face are redirect viruses, like Icaibathinda.org. Let’s not be around the bush: It’s crucial to understand why these seemingly less harmful intruders should concern tech enthusiasts and casual users alike, and why addressing them becomes a priority.
Firstly, redirect viruses are a form of malware that manipulates web browsers. They forcefully redirect your browsing journey to specific websites – in this case, Icaibathinda.org. It’s not just an annoying occurrence – it’s serious business. These destinations are often riddled with various threats such as phishing attacks, exploit kits, ransomware, and adware, waiting to pounce on unsuspecting visitors.
Threat Summary:-
| Threat Name: | Icaibathinda.org |
| Threat Description | It’s a recently discovered browser hijacker or a pop up virus meant to display frequent advert pop ups on screen and encourages users to interact with those. However, the interaction can be disrupting to users in all forms, so it’s better to stay away against those. |
| Threat Type: | Browser Hijacker, Adware, Pop-up Virus |
| Threat Symptoms | Modified settings in browsers, Frequent pop ups or redirect issues while browsing the web, Redirects to fake commercial or suspicious web addresses, etc |
| Threat Distribution | Free Downloads, Deceptive Advertisements, Fake Error Messages, and more. |
| Threat Removal | For efficient detection and removal of this threat, refer to instructions discussed under this guide. |
About Intrusion and Negative Impacts
Redirect viruses typically install themselves within your system through free software bundles that you install voluntarily. This stealthy arrival method brings them into your digital environment, uninvited. They do not announce their arrival with an unmistakable system slowdown or odd behavior synonymous with other types of potent malware, that’s simply not their style. This Trojan Horse strategy is precisely what makes them so dangerous.
But, the worst part? The data mining. By continuously redirecting you, they accumulate valuable information about your online habits, preferences, and sensitive details. More than an intrusion, it’s a blatant breach of privacy. Exposing such personalized data to potentially malicious third parties can lead to identity theft, unauthorized transactions, or worse, cyber blackmails.
Practices To Stay Ahead Of Malware
Keep those shields up by staying proactive. Ensure your system runs the latest software updates to avoid known vulnerabilities. It’s also indispensable to regularly scan your system with a trustworthy anti-malware solution.

Also, consider practicing ‘Safe Browsing.’ Be cautious and double-check before clicking on any suspicious links or downloading any “too good to be true” freeware. Remember, most redirect viruses hitch a ride into your system through these methods, so it’s essential to have stringent internet practices.

Don’t let the subtle nature of redirect viruses like Icaibathinda.org fool you into complacency. Addressing them with appropriate steps takes a cohesive blend of advanced digital tools and systematic netizen habits. Let’s tread the digital realm with informed caution, turning potential vulnerability into fortified security.
Performing a Full System Scan
Performing a complete system scan significantly enhances the identification and elimination of threats such as the Icaibathinda.org redirect virus. A redirect virus camouflages itself within your system, hence a full-spectrum scan is the most effective way to root it out. Here’s an in-depth look at how this process works.
Initially, a good quality anti-virus software such as Malwarebytes, Spyhunter, and Combo Cleaner meticulously examines every file and software in the system. Employing sophisticated algorithms, it identifies and isolates potential harmful elements. For instance, the perfect breeding ground for redirect viruses like Icaibathinda.org tends to be outdated software and old system libraries. The anti-virus software identifies these vulnerable elements and puts up red flags for potential infection.
Threat Removal With Malwarebytes Malwarebytes is a leading provider of antimalware software, dedicated to protecting users from the ever-growing threat of malware. With its advanced technology and comprehensive approach, Malwarebytes offers a robust solution to detect, prevent, and remove malicious software from computers and devices. Malwarebytes' antimalware software combines multiple layers of protection, including real-time scanning, behavior monitoring, and artificial intelligence, to identify and eliminate threats in real-time. This proactive approach ensures that users are protected from both known and emerging threats. It’s available as a free tool and we recommend it as a must have app on your device to keep your protected against threats. Step 1: Download Malwarebytes for your device by clicking on the link based on your operating system. Malwarebytes is available free of cost and can be used over cross platforms. However, the premium version offers more versatile features and protection to your device. You can register the app to premium version through in-app options or official website. Download Malwarebytes For Windows/Mac Step 2: Navigate to the folder where the installer file is downloaded and double click on it. The file is usually stored under “Downloads” directory.
Step 3: Once the installer runs, it opens Malwarebytes Setup Wizard with two options as Install and Advanced options. The Advanced option basically allows you to choose a directory where you want the app to install, select your language, and adding shortcuts. Just click on Install.
Step 4: You will now be asked to choose the type of protection you want, either Personal or Business. Based on your requirements, select the right option and click Next button.
Step 5: The setup will ask you to add a browser guard to keep your browsing safe. It’s an optional thing, but still you can choose adding the plugin to browsers to keep your online data safe. Once selected the appropriate option, proceed further to install the app. The installation process may end in a few minutes.
Step 6: After the installation is successfully done you can see a success notice. Click on Open Malwarebytes button now.
Step 7: After the Malwarebytes launches, click on the Scan button to start the scanner to identify present threats on your device.
Step 8: Sit back, wait and relax till the scanner searches for malicious traits on your computer. It may take time depending upon the storage size, and computer resources as well.
Step 9: After the scanning process completes, a screen with detected threats will appear before you. To remove detected malware or potentially unwanted programs from your device, click on Quarantine button.
Step 10: Malwarebytes may also ask you to restart your computer to complete threat removal process. So, just restart your computer. That’s it, your computer is now malware free. Threat Removal With Spyhunter SpyHunter is a powerful antimalware software designed to protect your computer from various threats, including malware, spyware, and adware. With its advanced scanning technology, SpyHunter can detect and remove harmful programs that may be lurking in your system. It also offers real-time protection to prevent new infections from occurring. SpyHunter is known for its user-friendly interface, making it easy for both novice and experienced users to navigate. It provides regular updates to ensure that your computer remains secure against the latest threats. If you're looking for a reliable antimalware solution, SpyHunter is definitely worth considering. Step 1: Download Spyhunter 5 for your device by clicking on the link based on your operating system. SpyHunter 5 Anti-Malware provides a 7-day fully functional Free Trial (15 days for Mac) with Credit card required, No charge will apply upfront. No charge if you cancel 2 business days before the trial ends. Download Spyhunter For Windows Download Spyhunter For Mac Step 2: Go to the directory where the installer is downloaded and stored. The file is usually stored under “Downloads” directory. Double click on the installer to run setup.
Step 3: Select your preferred language and click on OK button. This will initialize the installer, so click on the Continue button when prompted.
Step 4: You will be asked to accept the EULA and Privacy policy of the application to proceed the installation. So choose the option I accept the EULA and Privacy Policy, and click on Accept & Install Button.
Step 5: Now, the installation process will begin and progress bar can be seen. The process may take a while to complete, after which a successful installation notice is shown.
Step 6: The Spyhunter launches itself automatically following installation. Below mentioned screen will appear before you.
Step 7: Also, the scanner will start scanning your computer to identify present threats inside your device. During scan, it will show you detected threat’s name, security level, and details about the threat as well. Sit back & relax to complete the scan process
Step 8: The scanner once finished, click on Next button to proceed further.
Step 9: The app will ask you to buy its licensed version to complete the removal process. Alternatively, you can also avail a 7 day free trial under which the software will be fully functional to remove all threats.
Threat Removal With Combo Cleaner Combo Cleaner is a comprehensive security software designed to protect and optimize your Mac system. With its powerful features and user-friendly interface, Combo Cleaner offers a range of tools to keep your device safe from malware, adware, viruses, and other threats. It scans your computer thoroughly, detects and removes any malicious software it finds, and also cleans up junk files and unnecessary clutter to improve system performance. Combo Cleaner is known for its advanced algorithms and real-time protection, ensuring that your Mac remains secure and optimized at all times. Whether you are a casual user or a professional, Combo Cleaner provides a reliable solution to ensure the safety and efficiency of your Mac. Step 1: Click download button below to get Combo Cleaner for Windows/Mac on your device. Combo Cleaner Antivirus is available to download as free scanner. The scanner will scan and detect all inside threats on device, but users need to buy its license key to avail complete removal of threats. Download ComboCleaner For Windows Download ComboCleaner For Mac Step 2: Browse to the directory where the installer is downloaded (usually in ‘Downloads’ folder), and double click on the installer to start installation.
Step 3: The installer begins and will ask you to set some necessary parameters like creating shortcuts, starting the app on windows startup and more. Choose the right options based on your needs, and click Next button.
Step 4: The installer now starts to install Combo Cleaner on your device and will complete it in just a few minutes.
Step 5: Once the installation completes, click on Finish button. Do make sure the option “Launch Combo Cleaner and run initial computer scan” is checked.
Step 6: The initial computer scan will start with updating and installing Combo Cleaner antimalware database updates. It will take some time depending upon your internet speed, and other resources.
Step 7: After the database updates are successfully installed, the antimalware solution will start scanning your device for present malware threats. Sit back and relax to let the app complete its process.
Step 8: After the scanning completes, a screen appears with all detected threats on your device. Just click on Remove All Threats button. Threat Removal With Norton Antivirus Norton 360 is a comprehensive antivirus software that offers robust protection against various online threats. With its advanced features and real-time scanning capabilities, it ensures the safety of your devices and personal information. This antivirus software not only detects and removes viruses, malware, and spyware but also provides a firewall to protect your network from unauthorized access. Norton 360 is compatible with multiple platforms, including Windows, Mac, and mobile devices, providing a seamless experience across all your devices. Its user-friendly interface allows you to easily navigate through its various features and customize your security settings according to your preferences. Stay protected with Norton 360 and enjoy a worry-free online experience. Step 1: Click on the button below to get Norton 360 protection for your device. Norton 360 Antivirus is available and accessible over cross platforms. It provides a 7 day fully functional free trial with Credit Card. No charge deduction till trial period. Download Norton 360 For Windows/Mac Step 2: Download the installer and run it on your device. Click on Install button to proceed with installation steps further.
Step 3: The installation process will begin now with an increasing progress bar. Wait for the installation to complete.
Step 4: After the installation process completes, launch Norton 360 and click on Quick Scan option to start scanning device for threats.
Step 5: The scanner will initialize scanning computer for threats. This process may take some time depending upon the disk size and hardware resources of device.
Step 6: Once the scanner finishes, it will take all appropriate action against detected threats automatically. Click on Finish button to close the app.
Step 7: If you have purchased Norton’s license key, we suggest you to activate the application by clicking on Activate Now option.
Step 8: Norton 360 will now connect with its server to complete activation.
Step 9: Congratulations, your device is now protected with Norton 360 against all threats. |


Next, the scanning operation dives into your system, looking beyond the surface level applications, all the way down to the kernel level. The benefit of such profound scanning lies in its ability to expose potential threats that tend to hide in the lower-to-mid-level operations of the computer system. Once detected, the anti-virus software would either clean, quarantine, or remove these threatening elements, ensuring that your computer stays safe and operates optimally.
Also, a complete system scan highlights every data transaction happening in your system – another prime target for redirect viruses. As the anti-virus scans through the web browser’s data transactions, it identifies unusual patterns that might hint at a potential redirect virus attack. Once it spots such abnormalities, it invokes its removal tools to divest your computer of such threats.
Additional Tips To Consider
Beyond the identification and removal of the present threats, a complete system scan also patches up the potential vulnerabilities in your system. It runs checks on the crucial structure of your software, seeking any possible loopholes for future threats. Upon finding them, the software suggests immediate patches to avoid these threats from exploiting the vulnerabilities in the future.
Lastly, a complete system scan optimizes your system’s security settings. Often, redirect viruses alter these settings to ensure their smooth operations, and this is where a complete system scan comes in handy. The scan corrects these altered settings ensuring you regain full control of your system.
Manual Virus Removal Techniques
The crux of the problem lies in devising a swift and efficient strategy to manually remove the Icaibathinda.org redirect virus from your computer. While automated methods involving anti-malware tools are highly effective, some circumstances may necessitate a manual approach. Let’s unwrap what the manual removal process entails.
Firstly, you need to access the “Programs and Features” section in the Control Panel on your computer. In the list that is displayed, search for any newly installed or suspicious-looking applications. Right-click and press ‘Uninstall’ on any program that seems out of place or wasn’t intentionally installed by you.

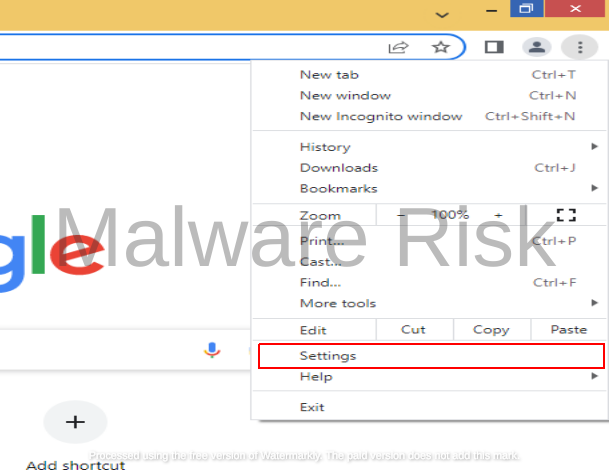
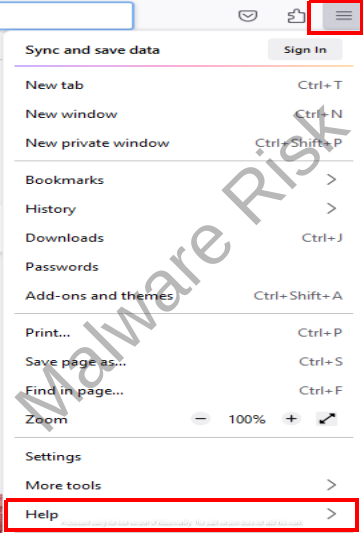
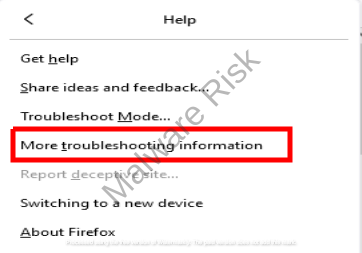
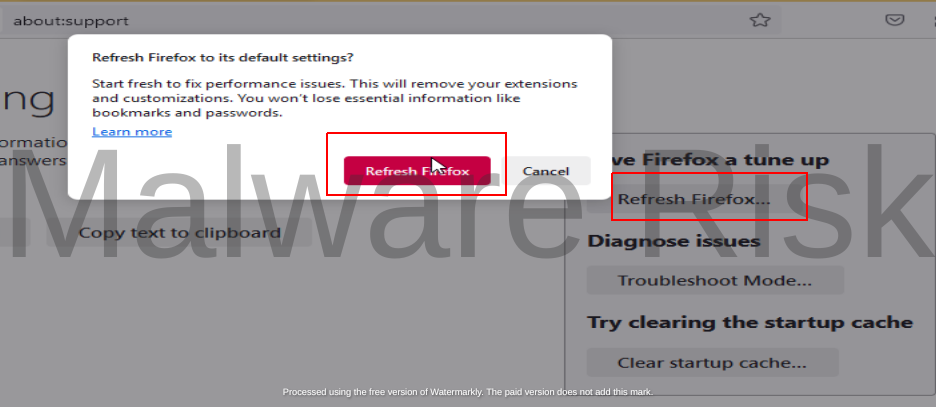
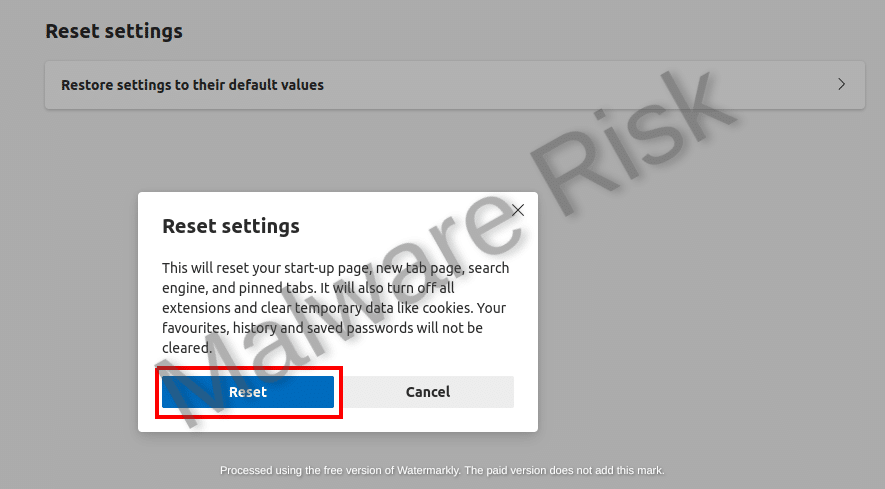
Post uninstallation, it’s time to reset your browser settings. This step varies based on the browser you are using:
Step 1: Launch Google Chrome on your Windows computer.
Step 1: Launch Firefox on your Windows.
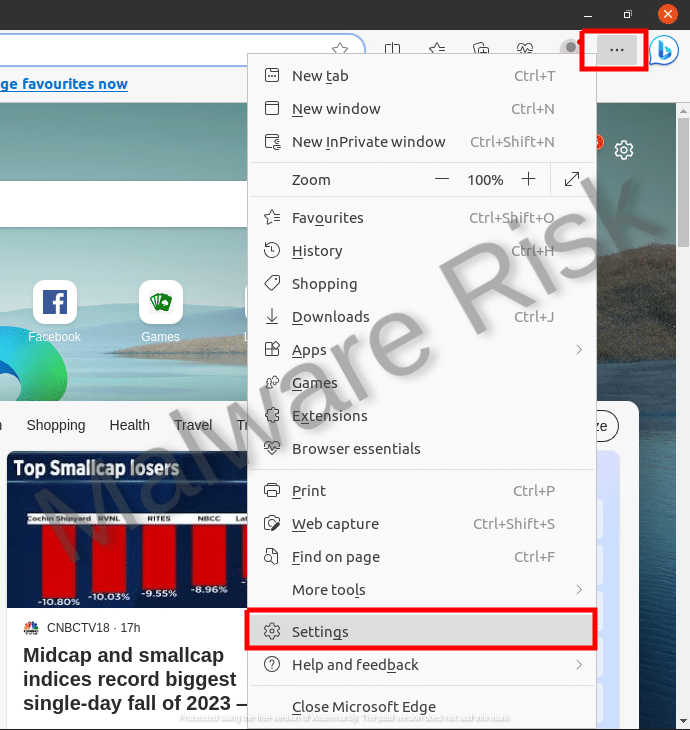
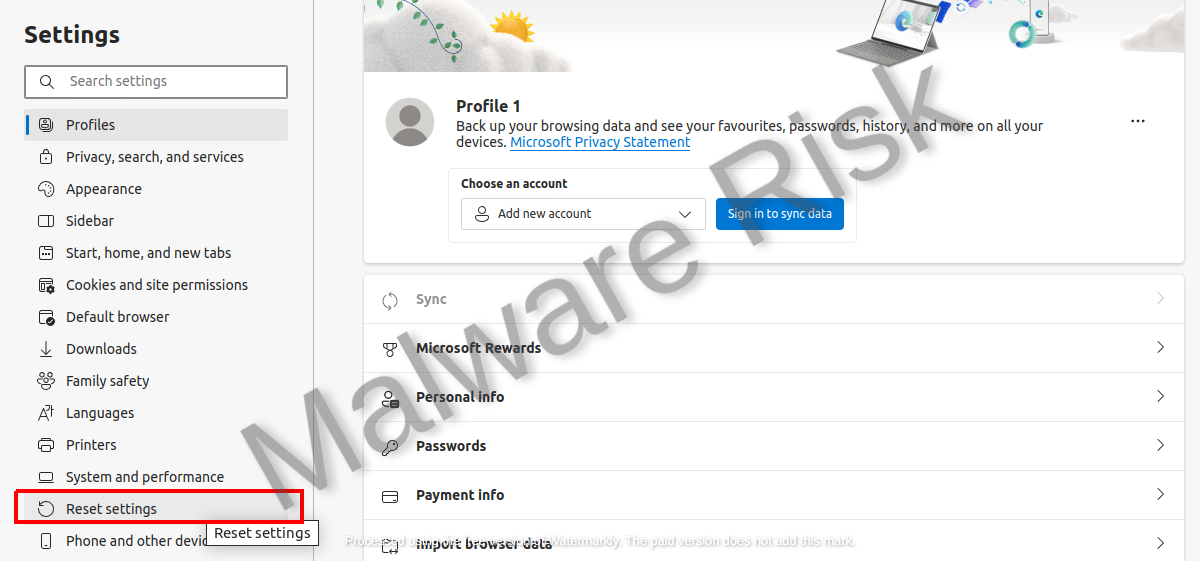
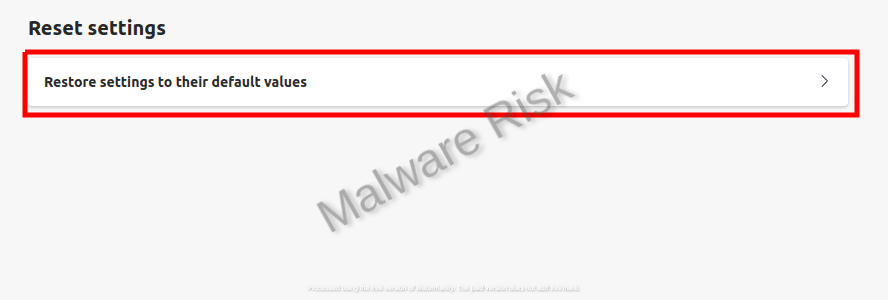
Step 1: Launch Edge and click on the three horizontal lines in top-right corner.
Resetting Safari on a Mac involves diverse steps like clearing the browsing history, emptying the cache, and removing extensions and cookies. Clearing Browsing History in Safari To clear your browsing history in Safari, click on "History" in the top menu, then select "Clear History." A dropdown menu will appear where you can select the length of history you want to clear - "the last hour," "today," "today and yesterday," or "all history." Choose the option that suits your requirement and click "Clear History."
Emptying Safari’s Cache The cache is a place where Safari stores website data to speed up the loading process. Over time, the cache can become bloated and may slow down Safari. To clear it, click on the "Safari" in the top menu, then select "Preferences." From there, go to the "Advanced" tab and select "Show Develop menu in menu bar." Close the "Preferences" window, and in the top menu, you'll find a new "Develop" option. Clicking on it will give you the option to "Empty Caches."
Removing Cookies in Safari Removing cookies can be done through the "Preferences" menu in Safari. Click on "Safari" then "Preferences," then go to the "Privacy" tab. You can either "Manage Website Data" to remove cookies from specific sites, or click "Remove All Website Data" to remove all cookies.
Removing Extensions in Safari Extensions are small software programs that can modify and enhance the functionality of the Safari browser. But sometimes, they might cause issues. To remove them, click on "Safari" in the top menu, then "Preferences". Go to the "Extensions" tab, where you'll see the list of installed extensions. Select the extensions you want to remove and click on the "Uninstall" button.
Access Internet Explorer SettingsClick on Internet Explorer to open the application on your computer. After opening Internet Explorer, locate the "Tools" icon. This icon typically looks like a small gear in the upper-right corner of the Internet Explorer window. Once you've clicked on this, a dropdown menu will appear. From this menu, select "Internet Options."
Understand the Implications of ResettingBefore resetting, understand what it means to reset Internet Explorer to factory defaults. By doing so, you're erasing any personal settings, extensions, or cookies you've set up since you've installed the software. This includes deleting your browsing history, disabling toolbars and add-ons, and resetting all custom settings to default. If you have any important bookmarks or saved passwords, make sure to back them up first. Navigate to the Reset OptionIn the "Internet Options" window, click on the "Advanced" tab. At the bottom of this tab, you should see a "Reset..." button. Click on this to open up the "Reset Internet Explorer Settings" window.
Execute the ResetAfter the "Reset Internet Explorer Settings" window opens, you'll see a box that you can check to "Delete personal settings." If you want to erase all personal data saved in Internet Explorer, including saved passwords, form data, and browsing history, check this box. If you'd rather keep your personal data and only reset the browser settings to default, leave this box unchecked. Once you've decided what you want to do, click the "Reset" button at the bottom. A confirmation window will appear to assure you that the reset was successful.
Verify the Successful ResetAfter you click "Reset", Internet Explorer will apply the changes and ask you to restart the software. Close Internet Explorer and open it again. The changes have now taken effect and your software has been reset to factory settings. To confirm the reset, navigate back to the "Tools" menu, select "Internet Options", and click on the "Advanced" tab. At the bottom of this window, you should see that your personal settings have either been erased or reset, depending on your previous selection. If executed correctly, Internet Explorer should now operate just as it did when you originally installed it. Resetting Opera on Windows
Resetting Opera on Mac
|


Let’s dig deeper. The Windows hosts file is next on your list. Certain viruses manipulate this file to control and direct internet traffic. To check if your hosts file has been compromised, navigate to “C: \Windows\System32\drivers\etc”. Open the “hosts” file through Notepad. If there are any suspicious or unfamiliar entries below the section marked as “# localhost” or “# ::1”, remove them.

The final step involves checking the DNS settings to ensure that they’re not manipulated. In your Control Panel, find your “Network and Sharing Center.” Click on the connection, then “Properties.” Find “Internet Protocol Version 4 (TCP/IPv4),” and ensure “Obtain DNS Server Address Automatically” is picked. If not, select it.

Note: Though this manual process for removing the Icaibathinda.org redirect virus can be effective, it is always smarter to rely on a combination of both manual and automated methods. The top-tier efficiency of antivirus software fused with the precision of manual removal methods promises a bulletproof shield against redirect viruses.
Wrapping Up
Overall, combatting threats like the Icaibathinda.org redirect virus requires a strong understanding of their nature, the harm they can inflict, as well as a proactive approach in undertaking the necessary prevention and removal methods. By performing a full system scan, you can create an early detection system against this and other threats.
Meanwhile, mastering manual virus removal techniques serves as an important skill in maintaining computer health and survival in the digital world. However, always remember, staying informed, vigilant and proactive against these cyber threats can be the most powerful defense against the digital woes of the times.
Frequently Asked Questions about Virus/Malware
A computer virus is a type of malware that spreads between computers and damages data and software. It is a program that infects files or system areas and makes copies of itself. Some viruses are harmless, while others can damage or destroy files. Unlike worms, viruses require user action to spread. They used to be spread through portable media, but now they are primarily spread through email messages. To avoid virus infections, it is important to not open unknown email attachments and to view email messages in plain text.
Viruses spread by infecting files or the system areas of a computer's hard drive and making copies of themselves. They can infect other programs on the same computer or on other computers connected over a network. In the past, viruses were primarily spread through portable media such as floppy disks, but now they are mainly spread through email messages. When you open an attachment or click a link in an email message, most viruses are activated. It is important to be cautious of email attachments and links, limit HTML in email messages, and view them in plain text to avoid virus infections.
A worm is a type of malware or malicious software that can rapidly replicate and spread across devices within a network. Unlike a virus, a worm can self-replicate and spread automatically without the need for human intervention. Worms can infect computers through software vulnerabilities, spam email or instant message attachments, or removable drives. Once a worm infects a device, it continues to spread to other systems, causing disruptions and potential data loss. Mitigating a worm attack involves containment, inoculation, quarantine, and treatment. It is crucial for businesses to have a coordinated response plan in place to effectively respond to worm attacks.
A Trojan Horse, or Trojan, is a type of malware that disguises itself as legitimate software or code. Unlike viruses or worms, Trojans require deliberate action from the user to infect a device. Once installed, Trojans can perform various actions, such as modifying data, stealing sensitive information, exploiting vulnerabilities, installing malicious programs, extorting users, setting up backdoor access, or carrying out DDoS attacks. There are different types of Trojans, including exploit Trojans, downloader Trojans, ransom Trojans, backdoor Trojans, fake AV Trojans, rootkit Trojans, SMS Trojans, banking Trojans, and Trojan GameThief. Some recent examples of Trojan attacks include Zloader, QakBot, and Andromeda.
Adware and browser hijackers are similar in some ways but have distinct differences. Adware is a type of software that displays unwanted advertisements on a user's device. It is often bundled with freeware or shareware and can track user behavior and collect personal information. On the other hand, browser hijackers are a specific type of malware that modifies browser settings without the user's consent, redirecting them to malicious websites. While adware may be a component of browser hijackers, not all adware is classified as browser hijackers. Both adware and browser hijackers can negatively impact user experience and compromise privacy and security. It is essential to have proper security measures in place to protect against both adware and browser hijackers.
Ransomware is a type of malware that encrypts a victim's data and holds it hostage until a ransom is paid. It prevents users from accessing their systems or files by either locking the screen or encrypting the files themselves. Ransomware can spread across networks and paralyze entire organizations. It uses asymmetric encryption, which makes it extremely difficult to decrypt files without the private key. Ransomware is often distributed through email spam campaigns or targeted attacks. It has been on the rise since the WannaCry outbreak in 2017 and has become more sophisticated, incorporating techniques like data theft and double extortion to pressure victims into paying the ransom.
To protect your computer from viruses, you can follow these steps:
- Install antivirus software: Use reputable antivirus software and keep it updated to detect and remove viruses.
- Keep software up to date: Regularly update your operating system and software to patch any security vulnerabilities.
- Backup your computer: Regularly backup your important files to an external storage device or cloud storage to protect against data loss from viruses.
- Use strong passwords: Create strong, unique passwords for your accounts to prevent unauthorized access.
- Be cautious of downloads: Avoid downloading files from untrusted sources and be cautious of email attachments, as they can contain viruses.
- Install an ad-blocker: Ad-blocking software can help prevent malicious ads that may contain viruses.
- Run virus scans regularly: Schedule regular virus scans on your computer to detect and remove any malware.
- Avoid suspicious links: Be cautious when clicking on links, especially in email messages, as they can lead to malicious websites. Hover over links to verify their legitimacy before clicking.
By following these steps and exercising caution while browsing, you can minimize the risk of viruses infecting your computer.
The signs of a malware infection include slow performance, unexpected freezing or crashing, diminished storage space, changes to your browser homepage, browser redirects, new browser toolbars, annoying pop-ups, unusual error messages, fake virus alerts, excessive ads, system crashes, loss of disk space, increased internet activity, changes in browser settings, disabled antivirus software, and loss of access to files. These symptoms indicate that your device may be infected with malware and should be diagnosed and treated promptly.
To avoid falling for tech support scams related to malware, you can follow these tips:
- Be cautious of unsolicited phone calls claiming to be tech support. Legitimate companies usually don't reach out to customers in this manner.
- Never call the phone number in a pop-up message on your computer. These pop-ups can be fake and are often used as a tactic by scammers.
- Update or download legitimate security software and regularly scan your computer for malware. Delete anything the software identifies as a problem. If you need assistance, seek help from trusted sources.
- Be skeptical of anyone claiming to be a tech support staffer from a reputable company like Microsoft. Don't provide personal information or grant remote access to your computer unless you've verified their identity.
- Educate yourself about common scam techniques and stay informed about the latest threats. This will help you recognize red flags and avoid falling for scams.
If your device is infected with malware, there are several steps you can take to address the issue:
- Confirm the infection: Look for unusual behavior on your device, such as slow performance, frequent crashes, or excessive pop-up ads. This will help you determine if your device is indeed infected with malware.
- Disconnect from the internet: Unplug your device from the network to prevent the malware from spreading or communicating with its command and control servers.
- Run anti-malware software: Use reputable anti-malware software to scan your device and remove the malware. Make sure the software is up to date and perform a thorough scan of your system.
- Back up critical files: Before taking any further action, back up your important files and data to ensure they are not lost during the malware removal process.
- Reinstall the operating system if necessary: If the malware has deeply infected your device and cannot be completely removed, consider reinstalling the operating system. This will wipe out all the existing data and software on your device, so make sure you have backups of your important files.
- Consider data recovery services: If you have lost any data due to the malware infection or the subsequent removal process, you may want to consult professional data recovery services to retrieve your lost files.
Remember to keep your device's software up to date, use strong passwords, and be cautious of suspicious links and downloads to prevent future malware infections.

Nishant Verma is a senior web developer who love to share his knowledge about Linux, SysAdmin, and more other web handlers. Currently, he loves to write as content contributor for ServoNode and also collaborated with MRLabs now.